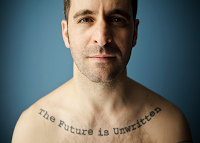
The way I use light for portrait work has been largely born from my street photography. This has meant using available light, controlled with modifiers including reflectors, scrims and flags.
The challenge of working this way revolves around the quantity of light that I have to work with. As I like to shoot in areas of open shade, this has often resulted in using higher ISOs at wider apertures, which can be very limiting.
So, when I had the opportunity to review the
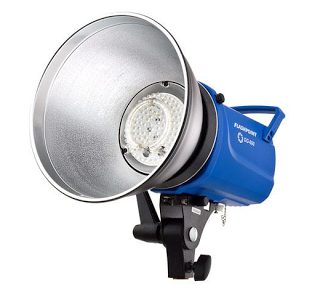
Adorama Blue Monolight (Flashpoint Digital DG-600 II), I thought it would be a good way to introduce a strobe into my repertoire.
The 300 watt-seconds strobe is a monolight, which means it directly supports both AC/DC power and doesn’t require a pack generator system, which is important, if like me, you don’t want to carry too much equipment in the field. An optional Flashpoint DG Battery Pack and Charger is light, compact, and makes for a complete system that I could take anywhere.
Weighing just 4 pounds and measuring 4 x 4.75 x 7.5 inches, the monolight is very portable and its rugged metal housing makes it ideal for working with it outside of a studio.
Though 300 watt-seconds doesn’t seem like a lot of power, it is actually more than enough to suit my needs. I wasn’t looking to completely change my approach, but rather to enhance it and provide myself a greater degree of flexibility. By introducing the monolight in the scene shot in open shade, I'm able to not only have the benefit of working with smaller apertures, but also improve color saturation and create contrast between the subject and the background based on brightness.
The unit has a Guide Number of 58 m/190 ft @ ISO 100 provides a 5 f-stop range, which you can reduce to 1/32 power by a knob control on the back of the unit, which also features a digital read-out of the power output. So, it was an easy thing to adjust the output of the strobe to compliment the available light that I was working with.
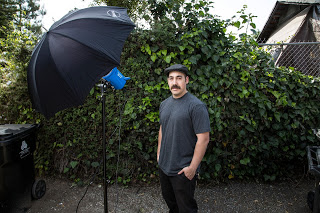
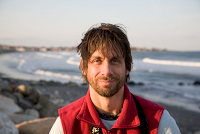
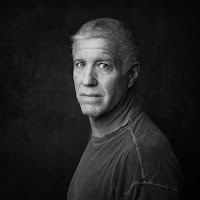
For my shots of
Dana Barsuhn, a Los Angeles-based street photographer, I knew I wanted to photograph against this hedge. If I had photographed him as I had in the past, the open shade would have provided even illumination not only for him, but also for the overall scene, which is a good starting- point. But since I wanted to work with a smaller aperture and didn’t want to increase my ISO to 800 or higher to achieve the shot, the use of the monolight diffused with an umbrella was the ticket.
I was able to shoot at 1/60 at f/9, which resulted in him being well illuminated by the background being slightly underexposed, which I accentuated later in Adobe Lightroom.
One of the noticeable improvements was the increased color saturation especially with respect to the skin tones. Though open shade provides a soft, even source of illumination, color saturation is often reduced. So, unless I use a reflector to direct some of sunlight back onto the subject, it results in my having to adjust for that when post-processing the image. Simply by using the monolight, I was able to achieve that look within seconds.
The monolight is daylight balanced (5600K) and it provided consistent color accuracy throughout as I increased and decreased the power output, which is important especially when working with skin tone.
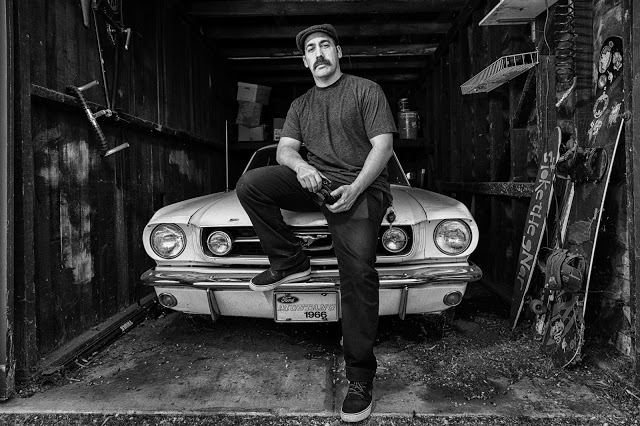
For the second shot, which showcased Dana’s classic 1966 Ford Mustang, I used a higher ISO setting to get some detail in depth of the garage, while the monolight provides the main illumination for him and that sweet car. The image was shot at ISO 400 at 1/125 second at f/8.
Because the light was positioned further away than the other shot, the light was a little harder, but it still worked for me here. The monolight made all the difference here, because that small aperture was really necessary to achieve a deeper depth of field, which nicely rendered all the detail in the garage. Had I shot this using strictly available light, I would have needed to work at a higher ISO order to achieve that same depth of field, but with an increase in noise.
It would have also resulted in the back of the garage being significantly darker because of the light fall-off. This shot would not have been possible without the use of the light.
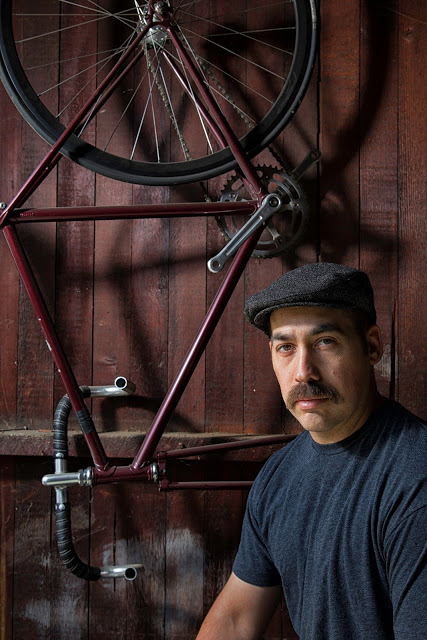
When I saw the bike hanging against that richly detailed garage wall, I knew I wanted a portrait that included these elements. For this, I removed the umbrella and only used the 8-inch reflector, which comes with the monolight. This resulted in a much harder quality of light, which produced more pronounced shadows, but which I thought fit the fill of the image that I was going for.
Shot at ISO 400 with an exposure of 1/100 second at f/8, I was able to get a look that wouldn’t have been possible with just available light. The improved depth of field and the color really made the monolight a valuable tool.
Though I would have liked to have more positive click-stops when adjusting the power output, that’s largely a personal preference. The digital read-out though bright, can be a little hard to read when I am in a bright situation and when the monolight is positioned relatively high on the light stand.
At a price point of just $199.95 for the monolight and 129.95 for the DG Battery pack, it provides a very affordable portable lighting kit, especially if you want to move up from using speedlights.
Other photographer might have a need for more power, shorter flash durations and other features, but I found that this unit provided me everything that I needed for my current way of shooting. It’s nice to find a very affordable piece of kit that caters to my way of shooting, rather than me having to completely change the way I shoot to serve the equipment.
You can find out more about the Blue Monlight by visiting the Adorama website at
www.adorama.com.